Weather Signs When You Don’t Have Your iPhone

Several years ago, I was camping in SW Missouri.  We had arrived the night before, and in the morning as the group was preparing breakfast, I happened to look down the meadow at campfire smoke at another campsite.  The smoke went up straight, and then leveled out as though it was hitting a ceiling.  I mentioned that we were in for some rain.  Everyone thought I was crazy, because there was a clear blue sky…no cloud in sight.  As the morning wore on, clouds starting blowing in and by evening we were drenched.  The next morning, while we were trying to get the wet wood to ignite, I was asked if the rain would continue.  I looked down the meadow and saw the smoke rising a bit and wafting up and over and around in a crazy generally upward pattern and stated that I thought it might just let up during the day.  Sure enough, we had no more rain.  I was lauded as a weather guru, but it was all in how to read the signs that are around us. And I’ll share them with you.  I wish I could say I had noticed all these signs myself, but I read this delightful little book that talked about reading the clouds and, particularly, the animal and plant signs.

Last week, on the last day of Earth Day Texas, the organizers closed the event about a hour earlier than scheduled.  They said a bad storm was coming, and a tornado watch was issued.  We packed up our booth, and headed to our cars.  But the skies didn’t look that threatening. As the lawn had lots of clover among the grass, I eye-balled the clover.  The leaves had not turned over – which they do ahead of approaching rain.  As it turned out, no bad storm passed through our area that night.

This week, as I was driving north to Oklahoma on a rainy, stormy day, it just wasn’t a good idea to pull out the smart phone and check the weather radar.  But I wanted to know if I should pull out on the next exit or could travel on…

The answer was with the cows in the pastures …  When a storm is approaching, the cattle will start congregating in a group, usually in the farthest corner of the pasture from the storm.  They will lie down with their tails to the approaching weather.  Watch the cows.

Some dogs will start panting rapidly as the air pressure increases.  I had a beagle I called my weather dog, because I would go to let her out sometimes and she would get to the door, pause and turn around…Nope…not going.  Sure enough, it would rain soon after that.

Flies and birds will settle just before a storm, and you have probably noticed that sounds travel differently, that it almost seems quieter just before a storm.

So…watch the animals and plants, and observe what is going on around you.  I think you will feel amazed at what you notice.  And it will give you time to plant the last things into your garden, or know when to tie things down to prevent damage.



Gardening During Drought – Part 2

In Part 1 we covered ways in which you can use compost and mulch in an existing garden bed to reduce water usage.

Now we will tackle a way to set up the garden bed to reduce water needs from the get-go!

hugelkultur bed

I’ve talked about the method before – it’s called Hugelkultur, and it hails from Eastern Europe.  Hugelkultur has been used for centuries, but it’s only become more popular after the publishing of  Sepp Holzer’s Permaculture.

Hugelkultur works to conserve in two ways:  Not only does the technique use all those trimmings from yard waste that go to the landfill, but the whole bed acts as a water sponge.

That certainly works well with water restrictions in North Texas communities and reduces water bills. I’m going to repeat what I have written before – a 100 sq. ft. bed planted in vegetables is expected to need 60 gallons of water weekly – at least.

I would love to see hugelkultur used in setting up school gardens.  The reason is that school gardens are often promised water from the district for only the first year – after that, the garden manager has to devise other ways of providing water – usually rain capture. But reducing water needs is critical, whether the district pays the bill or rain is borrowed.

Basically, hugelkultur copies what we find in a forest floor – dead and rotting trees, covered with limbs that fall, then by leaves which decompose and we have a soft, cushiony bed in which all sorts of life thrives.

Here’s what happens:  the logs (old or new) rot and become porous. They serve as excellent habitat for mycorrhizal  fungi, which are essentially for healthy plants.  AND, as the wood rots, it acts as a sponge for water.


The end result is that hugelkultur beds don’t need to be watered nearly as often.  I talked to a community garden manager last year, asking about the experimental bed she had put in.  She stated that in October they had built the bed, planted broccoli, cauliflower and cabbage and – when I talked with her in February – they had still not watered since the bed was planted!

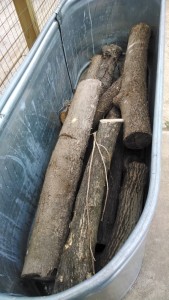
Hugel container logs

Traditionally, the hugelkultur process starts with a trench in which logs are placed, then twigs, then leaves, then compost and soil on top.  It can be anywhere from a foot high to several feet. It all depends on where you live, what you want to put into it, and how high you want it to go. You can even install a hugelkultur bed for ornamentals that your HOA will approve of – just start with a trench and only go as high as 12” for the mound.  Many front yard plantings go that high with mulch on top.

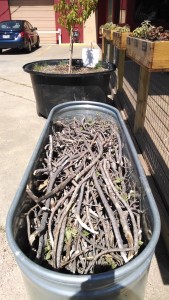
Hugel container sticks

The bed doesn’t have to be in-ground either.  Hugelkultur can be built on the ground, or in a container.

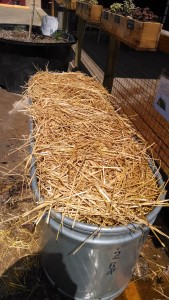
Hugel container straw

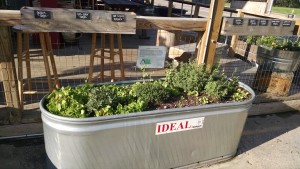
One garden I built was in a horse trough – I drilled ½” drainage holes about 8” apart on the sides of the trough. Then filled with logs, sticks, and straw, and covered with a layer of compost and planted herbs.

Hugel planted

I read online about a lady who takes muck tubs (they are the large plastic tubs with plastic rope handles often seen in barns for hauling…muck…), puts holes in the bottom and puts a short log upright in the tub.  She then drills holes in the upper end of the log (to encourage water to go into the log), fills with leaves and compost and tops with soil.  Then she plants.  She says at the end of the season, after having reduced the water needs in her muck tub containers, her plants have grown their roots around the log.  I’m going to have to try this I think this winter!

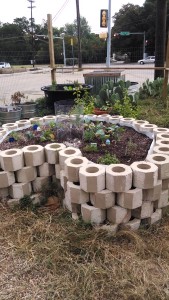
We adapted hugelkultur last month, when we built a formal keyhole garden. The home owner had trimmed crape myrtles and was about to put them out on the street for pick up.  We put those trimmings in the bottom of the keyhole garden, along with leaves, cardboard, dryer lint, straw, compost and then top soil and mulch. The garden will be a compost pile with hugelkultur overtones…a mixing of two incredible water-holding, nutrient-rich planting environments.

One caveat – the garden bed will decrease in height over time, so just keep adding mulch and compost on top. And you’ll have the richest, softest, best water-holding beds imaginable.

Be creative.  Use the concept and let me know how you have used this technique that mimicks the forest floor.

Gardening During Drought – Part I

As I was driving through Plano the other day, I was thinking of California, which is in the news with state mandated water restrictions.  There are signs on most well-travelled roads that watering restrictions are in force.  Water conservation is good any time, but with a continuing drought, we have to re-think how we garden and how we water.

There are a number of ways to reduce watering when installing/replanting a garden.  First, the more organic matter that is in the soil, the more it will hold the water it gets.

Sometimes folks use things to break up the soil and aerate it, but don’t realize that it isn’t helpful for holding water.  Peat moss has been the favored clay loosener, but I was reading the other day that peat pots tend to cause soil to dry out faster – leading to more frequent watering.  Does that mean that it also doesn’t hold water as well when mixed in the soil?  A better amendment for potting is sustainably harvested coco fiber – it also holds water quite nicely.

What’s that?!

Coco fiber is that fiber on the outside of a coconut.  It comes in bricks and I’ve seen them available at local garden nurseries such as Redenta’s as well as North Haven Gardens.  The bricks are made of fibers that are dehydrated and compressed. The fun part is when you put that brick in a LARGE container to rehydrate (not the regulation 5-gallon bucket, which I heard one person busted during the rehydration process, because it wasn’t large enough).  Put water in the water in the container with the brick and watch what happens – it’s great for kids to participate in this process.  If you want to get mucky, start massaging the fiber off the brick into the water – you get a slurry of muddy mass.  THIS is what you use to mix into potting soil or into raised beds to loosen clay, aerate the bed, and provide moisture retention.

Because the coco fiber does hold moisture – you just witnessed this quality when you rehydrated it!

So we need organic matter – that also means compost and lots of it!  If you haven’t started your compost pile, now (whenever now is) is the best time.  Never too late.  I’ll write another week on compost piles – the slow, the soon and the real quick methods. You can also buy compost (bagged or by the pickup load or by the dump truck load) from folks like Soil Building Systems.

Organic matter – lots of it.  That’s number one.

Then there’s mulch.  Lots of it, too.  Mulch can be bagged stuff you get from the nursery, or delivered by the dump truck, or gathered yourself on the side of the street (read:  leaves in bags). You can also buy straw (not hay) to use as mulch.  Newspapers work, as does cardboard, spread around your plants and watered in well and then covered with leaves (watered in well also).

Leaves make excellent mulch.  Think of a forest floor and how the leaves carpet the ground, keeping it moist and soft, then deteriorating and becoming part of the soil.  Leaves are also free.

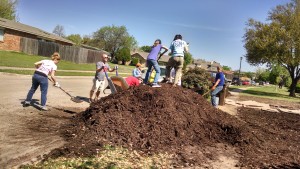
I should note here that if you get a dump truck load of mulch, you might want to invite some friends over to help you distribute it.  Here’s a picture of a mulch-spreading party this last weekend.

Mulch mountain

Mulch is magic.  It serves many purposes – first, it keeps weeds down (yay! less work!).  Second, it shades the soil so that the plants’ feet stay cool even in the hottest baking sun.  That means less water, because it prevents the soil from drying out.  And third, mulch condenses moisture from the air during the night, bringing more moisture to the soil and your plants.    (NOTE:  Do not use cedar bark mulch on vegetables – it’s best used in ornamental plantings.)

All that compost and mulch results in less watering needed to keep your garden going and producing.

In doing some calculations for a community garden’s rain water collection needs, I read that 100 sq. ft. of conventional vegetable garden needs 60 gal. a week at 60 degrees Fahrenheit.  Obviously as the temperature goes up, more water would be needed.  I couldn’t find any figures for how much mulch and organic matter reduce that, but I’ll bet it’s quite a bit – maybe as much as 50%.  Be kind to your water bill – and conserve.

In Part 2 (next week) I’ll talk about how we can build garden beds that require even less water.

Hornworms and Companion Planting in the Garden

In a gardening class this weekend, the discussion turned to growing tomatoes and the prevalence of the tomato hornworm.  Truth be told, I have not, in the last two decades seen a hornworm on my tomatoes.  Maybe I just don’t see them, but I sure don’t see any leaves eaten either.

Hornworm

Whitney Cranshaw, Colorado State University, Bugwood.org


Here’s what I do to avoid them (and other pests).

Borage, a lovely purple flowered herb, can be grown with the tomato plants and keeps hornworms away.  I also plant marigolds in the vicinity (to ward off root knot nematodes that can devastate tomatoes), and basil.  Not only do the tomatoes have company, but I get lovely flowers, cucumber-tasting borage leaves for salads, and fragrant basil.

I also don’t plant tomatoes in the same garden space two years in a row.   In fact, I’m on a 3-4 year rotation.

The practice of companion planting can produce more food for the space than just planting recommended spacing of mono-crops.

I’m a big fan of companion planting over and above any pest control benefits. Companion plants are those that help each other, and sometimes even increase yields for each other.  Friends helping friends.

A good companion planting with strawberries is spinach.  They both like more acidic soil.

Carrots go well, when planted among tomatoes late in the summer/early in the fall, when the tomatoes shade them from the hot sun, yet let them get a start.  The carrots use the under-surface growing horizon and are ready to burst forth when the tomatoes are done for the season.  Two crops from the same space.

Potatoes and beans (particularly bush beans) go well together.  They protect each other from Colorado potato beetle and Mexican bean beetle.

Okra and peppers do well together, especially if the okra is used as a windbreak for the peppers.

And if you’re growing lettuce and have problems with rabbits helping themselves, I’m told that onions planted with the lettuce will repel the rabbits.

[NOTE: A good read for companion planting is Carrots Love Tomatoes.  Look for the full citation under the Resources tab on this website.]

And while I’m on the subject….how about planting lots of rosemary?  It helps repel mosquitoes!  I advocate rosemary plantings around the deck or patio.

Other repellents or remedies include pepper flakes and orange peels.

To repel pests eating plants (e.g., basil, sage, peppers), boil red pepper flakes in water. Strain into a spray bottle and add about 1-2 tsp of dish soap (preferably 7th Generation or Ivory Soap). Shake and spray on the plant leaves.

For fire ants, boil orange peels in water with some whole cloves.  Strain into a jar and add the same amount of water.  Pour on the mound. May have to repeat after about a week. It makes the ants go away.


Garden Uses Simple Method of Rainwater Capture; Chard Loves the Snow!

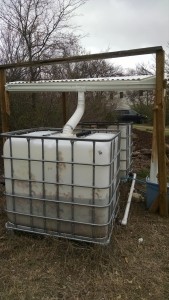
DK rain capture


One of the challenges of small community gardens can be the cost of bringing water to the property.  If the garden is on a vacant lot, then there is no large building from which to gather rainwater. What to do?

But there is a solution, and one garden in Dallas, the Divinekinship Community Garden, is serving as the model.

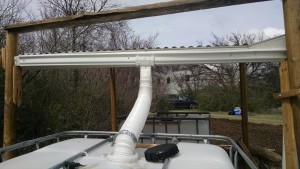
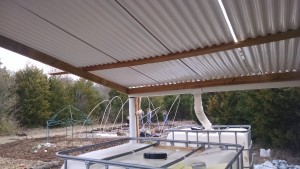
They have constructed a roof on poles – I call it a rainwater capture shelter.  More specifically, it is a roofed, open sided structure approximately 8-9 ft. square, supported with 8’ landscape timbers at the corners (buried about 18” into the ground for stability), with a plastic/fiberglass corrugated roof.  The roof is approximately 6 ½ feet high at one end of the structure, and approximately 6 feet high at the other end, so there is a slight slope down to a gutter, which feeds via a flex-spout into an IBC tote.  The IBC tote is connected to a second IBC tote for overflow.

An estimate of the rainfall harvesting capacity is:      9’ x 9’ = 81 sq. ft. of roof.  x .6 gallons/sq ft/inch of rain = 486 gallons captured in 1” rainfall.

The total cost, exclusive of IBC totes, is approximately $100-$110, if materials are new.

Here are some pictures of the setup.  If materials can be scrounged someplace, the cost goes down.

DK rain gutterDK rain roof

The drought conditions in the Dallas/Fort Worth area continue.  And some communities may be facing more severe water restrictions this summer. A check with the National Weather Service revealed that we received 21.32 inches of rain in 2014. In 2013, the annual rainfall was 29.4 inches; in 2012, it was 31.26 inches.  Even if there is another water source for the garden, capturing rainfall has the potential to cut the water bill substantially.

And there’s another way to reduce water usage:  Mulch. Heavy use of mulch as well as working lots of organic matter into the beds will help reduce the water needs of the growing beds.

 Chard after snow


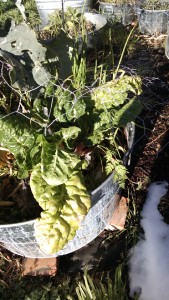
My chard came through the recent freezes and snow with flying colors.  Almost as if it energized the plant.  Love chard.

Snow Gardening

Is this the last blast of winter?  Maybe….it seems like it’s all coming at once.  But I do remember that in 2010 we had a freeze in April.

Caution is the watch word for early spring gardening in North Texas.  Be flexible, and be ready  to haul out the covers for plants that were just placed in the ground. snow garden

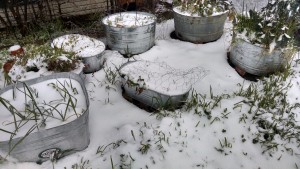
Looking at my garden tubs, I’m thankful I didn’t have enough time to plant collards, radishes and more lettuce just yet.

The garlic is also weathering the snow well. They’re in the square tub.  I’ll check to see how the bulbs are forming when the snow melts.

But look at the chard in the picture below (well, it’s hard to tell because it’s under all that snow!)…it’ll come back strong when it warms up a bit.  Chard is durable and I’ve found it’s a perennial – hardy perennial.  The downside, is that as it gets older and harvesting takes the outer leaves, the inner ones become smaller and smaller.  But they are tender and tasty!  Note that the green onions (those wisps at the front) are doing well, too.snow chard


The chickens are well suited for the cold – they have feathers and down, and I’ve tarped the north and most of the west side of the run so that no snow gets into their habitat.  I just keep them busy with scratch and some cracked corn (extra carbohydrate to help them keep warm).

snow chickens

Next week will warm a bit.  I’ll write more about what I’m planting next week – and if you’re in the Dallas Design District, stop by for my Straw Bale Gardening class at Trinity Haymarket (March 7, 10 am – free).

Until then, stay warm.

Straw Bale Gardening Class Postponed

Due to weather, we’re postponing the Straw Bale Gardening Class until next Saturday (March 7).  The weather is deteriorating, it’s not supposed to be above freezing today and freezing rain expected tomorrow.  Not good for driving.  We don’t want folks risking life and limb to attend the class.  Stay warm and off the roads as much as possible.

Gardening with Children and School Gardens

Gardening with children can be so rewarding.  Not only can it be a time for quality interaction, but it can serve as a stepping stone to learning about a plant’s needs, bugs, weeds and patience.

For instance, all plants need soil, water, nutrients (these are plant vitamins – like compost, worm poop, fertilizer), sun and temperature (cold season vs. warm season).  Then there are the bugs – the bad ones that eat the plants or damage them, and the good ones that pollinate the plants or eat the bad bugs.

In addition, the child learns what weeds are and why they take food away from the plant and must be removed.  But not all “weeds” are bad – some, like dandelions, have deep roots and help bring nutrients from deep in the soil up so the other plants can use them.   Weeds are just plants that are in the wrong place.

In gardening, a child learns patience.  My father once said, “You can hurry people, but you can’t hurry a plant.”  And that is so true!  There are some ways to speed things up a bit, but a seed is not going to sprout and grow to fruiting maturity in a week.  Besides, it’s exciting to go out each day and see what how the plants have grown, and to watch as a tomato slowly ripens to picking maturity.

Rainbow garden

There’s even such a thing as a rainbow garden – there are so many vegetables that are available in colors.  A child could help you pick out and plant seeds for purple or white carrots, black or pink tomatoes, blue or orange bell peppers, or even purple cauliflower.  The garden doesn’t have to be all green – it can vibrate with color!


rainbow carrots 2

Does your child’s school have a garden?  School gardens provide a wealth of learning and teaching opportunities.  There are now a wealth of curricula available online for teachers (and parents) to access.  One site that comes readily to mind is www.edibleschoolyard.org  . The Edible School Yard Project was started by Alice Waters (of Chez Panisse in Berkeley, California) a decade or so ago.  I could get lost on the site, with all the lesson plans, searchable under a number of variables, and constantly being added by teachers under an open source program.

Here’s a look at one school garden I visited recently – the 3rd and 4th graders were harvesting broccoli and they had cabbage heading out beautifully.

Moss Haven cabbages

Another curriculum that is becoming available soon is from SlowFood USA (www.slowfoodusa.org ) The Slow Food National School Garden Program is developing curricula for elementary through high school. The curriculum can be accessed online as it becomes available.  Further, some assistance for starting up and maintaining school gardens is available through a grant from Chipotle. Contact your local Slow Food chapter (www.slowfooddallas.com ) for more information – or you can email me (I’m working on the Garden Committee for SlowFood Dallas) at info@AnitasArbor.com .

Compost Those Leaves!

Now is the time to gather the leaves for your compost pile – I see bags and bags on the streets, and they will be picked up and gone to the landfill and not available until next year!  You need those leaves for mulch for your plants as well as compost.  AND, if you start your compost pile now, you should have rich, rich black compost with which to mulch your spring garden!

My friend Melanie, a Master Composter, will be teaching a class on composting at Trinity Haymarket (1715 Market Center Blvd in the Design District in Dallas) on Saturday, February 21, at 10 am.  It’s free and she is a great teacher.

In addition, Trinity Haymarket is taking orders for worms (for vermicomposting) as well as worm castings (Wow! do plants love those!) for delivery on February 21.  The worm products are from Texas Worm Ranch, owned and run by Heather Rinaldi. Located in Garland, she also has some dynamite classes for gardeners.

If there is one thing that is most important for the garden, it’s COMPOST!  And it doesn’t need to cost anything. You just use the materials you have around the house.  Compost happens when carbon and nitrogen-based materials are broken down by bacteria and fungi and become rich, black soil.

You can see compost when you go to a forest, and dig down a bit into the ground under foot.  It has happened slowly, as leaves and other matter have been deposited and then moistened with rains and decomposed.  It’s a natural process. Compost bins simple

All that you need is a place to start a pile – you can make it simple, like the photo which shows my friends’ wire bins, or you can buy a really nice aerating compost cage or a compost tumbler.  It just depends on how much time you have (do you want compost really quickly, or can you wait a few months?).

What goes into compost?  The rule of thumb is 3 parts brown to 1 part green.  As you build the pile, you should water it down – not wet as in dripping, but moist like a wet sponge.  It will help the little microbes get going better.  A dry pile doesn’t work or heat up very well.  And if you want compost in about a month or so, then you have to turn it and make sure everything is moist as you turn it.

There’s a list of the browns and greens below as a guide for you.

Browns (these are carbon sources) 

cardboard (shredded is best)

wood ash (but not much)

dead, woody plants (chipped/shredded trees, brush)

leaves – dry, yellow or brown

grass – brown only

sawdust

straw

dryer lint, vacuum cleaner waste

paper or wood products –(e.g., shredded newspaper, magazines if not too much slick paper)

natural fibers – cotton (100%), wool, silk


Greens (these are nitrogen sources)

grass clippings

hay

fresh green leaves

manure

kitchen scraps – no meat

coffee grounds/tea bags – make sure filters are biodegradable


Items NOT to add: 

Animal products (e.g., meat, cheese) – they can introduce disease and unwanted bacteria as well as attract critters to your pile.

Diseased plants – these can pass diseases to your garden through the compost. The only way to do away with diseases (and weed seeds) is to make sure your compost pile heats up.

Sawdust and wood shavings are okay, as long as they do not include things like bois d’arc, or cedar because these tend not to decompose easily, nor do they encourage micro-organisms.

The Smaller the Better

When putting items on the compost pile, think smaller – break or shred or chop larger items so that there is more surface area for the microbes to act upon.  The bigger the pieces of material, the longer they take to break down.

When you turn your pile, break up any clumps that you find.

Turn Your Pile Often

This keeps things moving and aerates. It also lets you see how the pile is working. An aerated pile heats up with the microbial activity.  And you’ll know when it’s done because it will be crumbly black and rich, and smell earthy. pelicans

Just a side note, while I was out visiting my friends in East Texas, not only did I notice their great, simple compost bins, but I also watched the pelicans who inhabit their little lake, taking advantage of the plentiful fish.  It was a pleasant, peaceful time.  I sometimes forget about the wonderful places in this great state of Texas!


Building a New Way….in Community Gardens

I was musing yesterday as I was visiting a budding community garden. Most follow the model of outlining beds using timber and then filling in with soil. Sometimes there is a compost pile and compost and mulch are applied sparingly. What if there is another model that is yet to be implemented which is water-wise and drought tolerant? Much like the beds I saw (and posted a picture of them) in the southern Dallas county garden – outlined with logs from the property, filled with mulch several inches deep and with ollas for watering. What if hugelkultur beds became the norm – like a community garden in Plano is working toward? Or keyhole gardens? or other techniques borrowed from drought-stricken areas around the world? If we are to continue to install gardens for the community – and promote and practice farming in the city – then we need to think outside the box as water restrictions become the norm rather than the unusual.

hugelkultur bed

Hugelkultur comes from Eastern Europe, and mimics the forest floor – with wood then twigs then leaves then grasses, all of which compost and then dirt on top.  As the wood deteriorates, it creates a rich environment for the micro-organisms and fungi that are necessary for drawing nutrients from the soil and making them available to plants.  Also, as the wood deteriorates it becomes spongy and holds water.  The net result is that a hugelkultur bed, once established, needs much less watering than a traditional garden bed.  A great reference from a pioneer in the refinement of this technique is “Sepp Holzer’s Permaculture: A Practical Guide to Small-Scale, Integrative Farming and Gardening.”


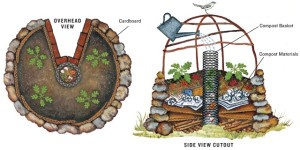
The keyhole garden technique was developed by nonprofits working in dry-land Africa. The goal was to create a garden bed that would grow the maximum amount of food crops for families with a minimum of water. It is essentially a compost pile within a wall.  Once the bed is established, the central wire cylinder is the place that compost (kitchen scraps and other compostables) is placed, and any watering that is done is in the cylinder.  The moisture is then pulled out into the soil where the roots are as it is needed.  A structure of bent PVC pipe creates a framework to support either shade cloth, to protect plants from searing summer sun, or poly to extend the growing season from early spring to late fall and possibly through the winter here in North Texas.  Dr. Deb Tolman, from whom I learned the technique, says that you start with a dumpster load of cardboard that goes into the garden, along with piles and piles of leaves, newspaper, food scraps, manure, old cotton t-shirts, straw, grass clippings, and anything else that is compost-pile fodder.  These are carefully moistened as they are stomped down and compressed before additional layers are added.  Then the whole thing is topped by compost and top-soil.  And planted.  Building a keyhole can be a group party – with a large group, once the wall is built, it only takes about 2 hours from start to planting!

One important advantage of a keyhole garden is that it is perfect for someone who cannot bend over to weed or plant, yet wants to continue to garden.  It’s a raised bed extraordinaire!

Contact me if you want a hugelkultur bed or a keyhole garden to be part of your gardening experience this year!